Are you tired of losing money on hidden FBA fees and inventory delays? Creating a precise Amazon shipment plan is the ultimate secret to scaling your brand’s revenue. This comprehensive guide from Megaficus will walk you through every step to ensure your stock is processed quickly, safely, and cost-effectively from now on!
Quick Summary
- Definition: A structured set of instructions for Amazon to receive and track your inventory through the “Send to Amazon” workflow.
- Cost Efficiency: Avoiding strict inbound performance fees by ensuring accurate measurements and proper labeling.
- Preparation: Vital prerequisites include an active FBA listing and ensuring boxes remain under the 50 lbs weight limit.
- Quantity Adjustments: Understanding that Amazon only allows minor shipment changes of up to 5% before requiring a new plan.
- Verification: Utilizing the Shipping Queue and tracking IDs to ensure inventory reaches “Received” status without errors.
What is an Amazon Shipment Plan?
An Amazon shipment plan serves as a formal set of instructions you provide to Amazon so they can accurately receive your inventory at their fulfillment centers. You can think of it as a digital manifest that bridges the gap between your warehouse and the vast Amazon logistics network.
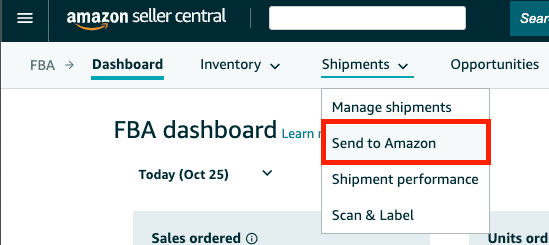
The modern process is managed through the “Send to Amazon” workflow, which replaced older methods to offer a more unified and friendly user experience. This system allows you to define exactly how many units you are sending and which specific products are packed within each shipping box.
By using this tool, you can track individual SKUs, monitor exact quantities, and see which destination fulfillment centers have been assigned to your shipment. Megaficus’s clients often find that utilizing this digital workflow reduces the manual paperwork previously required for inbound shipments, ensuring every unit is accounted for from the moment it leaves your door.
Why is a Proper Shipment Plan Vital for FBA Sellers?
Inventory accuracy is a primary reason why a detailed plan is so helpful for anyone looking to maximize their Amazon business revenue. When your data matches the physical boxes, Amazon can distribute your products across their centers with much higher precision and speed.

Cost efficiency is another major factor, as a proper Amazon shipment plan helps you avoid unplanned prep fees or costly misrouted shipment charges. If you send boxes to the wrong center, Amazon may charge a manual processing fee that eats directly into your profit margins.
So far, Amazon has implemented a new inbound defect fee per unit for shipments that do not follow the approved plan. This means that a small error in your planning could lead to a significant financial penalty that reduces your overall monthly income.
| Product Size Tier | Weight Category | Fee per Unit |
|---|---|---|
| Small Standard | 16 oz or less | $0.32 |
| Large Standard | 12 oz or less | $0.38 |
| Large Standard | 3 lb to 5 lb | $0.74 |
| Large Standard | 15 lb to 20 lb | $1.74 |
| Small Bulky | 5 lb or less | $1.38 |
| Large Bulky | 42 lb to 50 lb | $5.72 |
Finally, a well-executed plan leads to much faster check-ins, as proper labeling allows the warehouse staff to scan and stow your items immediately. When you label correctly, you might see your stock go live in 48 hours, whereas a poorly prepped shipment could sit for weeks.
How to Verify Your Shipment Plan for Accuracy?
Verification is a helpful phase that happens after you have physically handed the boxes over to the carrier for their journey to Amazon. You can regularly monitor the Shipping Queue status to see if your packages have been picked up, are in transit, or delivered.
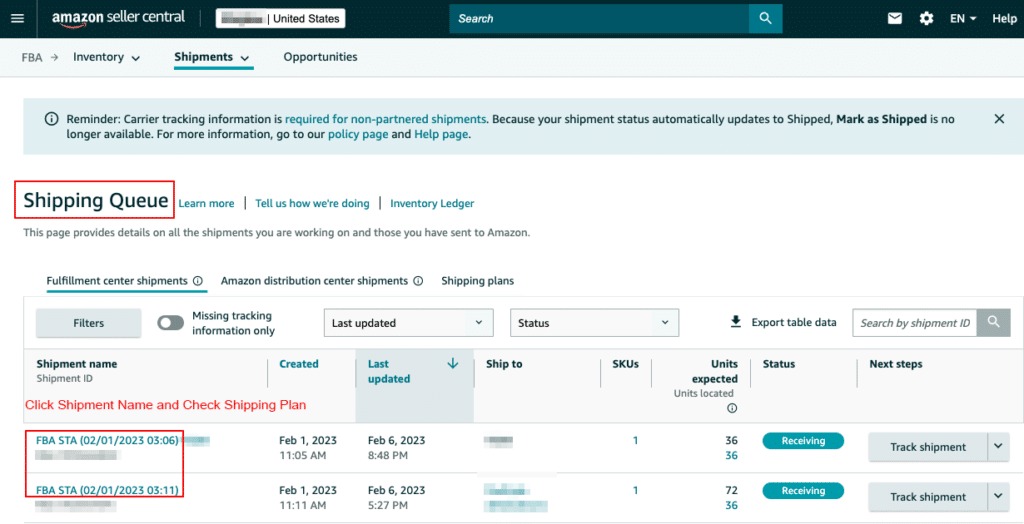
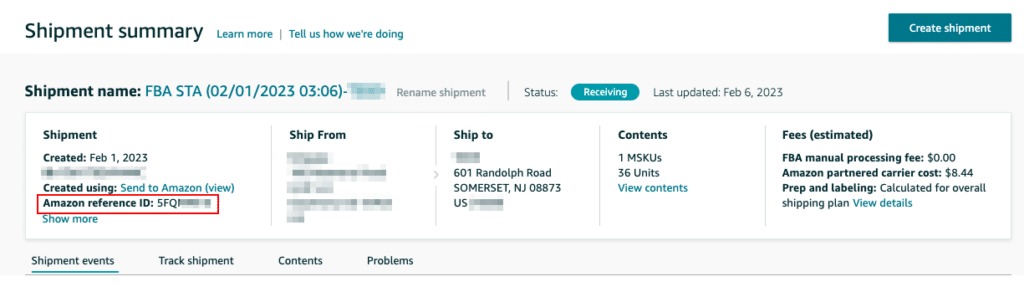
It is useful to check the Shipment Summary page to cross-reference the number of SKUs and total units you sent against what Amazon received. If you sent 100 units but Amazon only shows 98, you can use this data to open a reconciliation case.
You can also use tracking IDs to monitor the progress of your shipment until it officially hits the received status in the system. For instance, if a pallet of electronics is delayed at a regional hub, having the tracking ID allows you to alert Amazon support.
| Action Item | Recommended Tool | Benefit |
|---|---|---|
| Monitor Status | Shipping Queue | Real-time tracking of logistics |
| Unit Reconciliation | Shipment Summary | Identifies missing or damaged stock |
| Error Troubleshooting | Inbound Performance | Avoids future defect fees |
| Data Export | Excel/Reports | High-level inventory analysis |
What to Prepare Before Creating Your Amazon Shipment Plan?
Before you begin the digital workflow, you can ensure success by having an active FBA listing already set up within your Seller Central dashboard. You cannot create a shipment for a product that is currently set to Merchant Fulfilled (FBM) without first converting the fulfillment type.
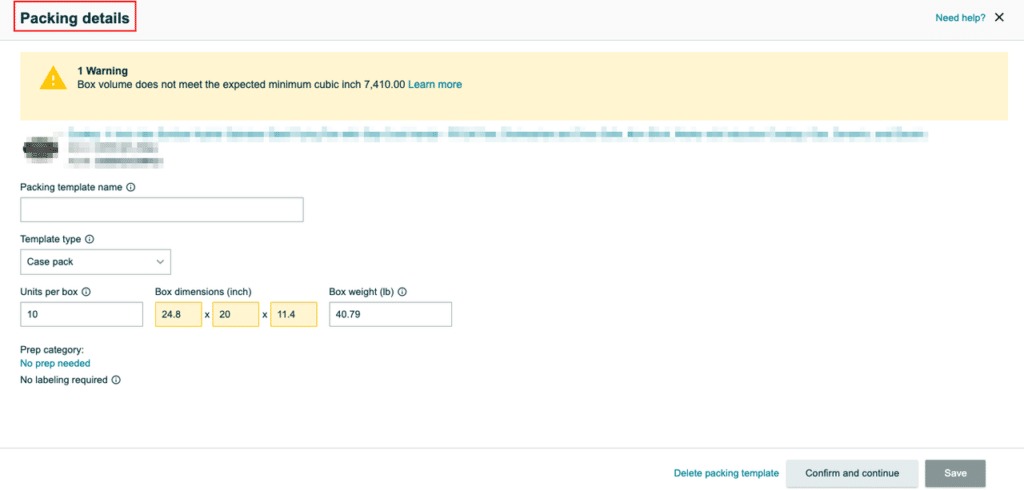
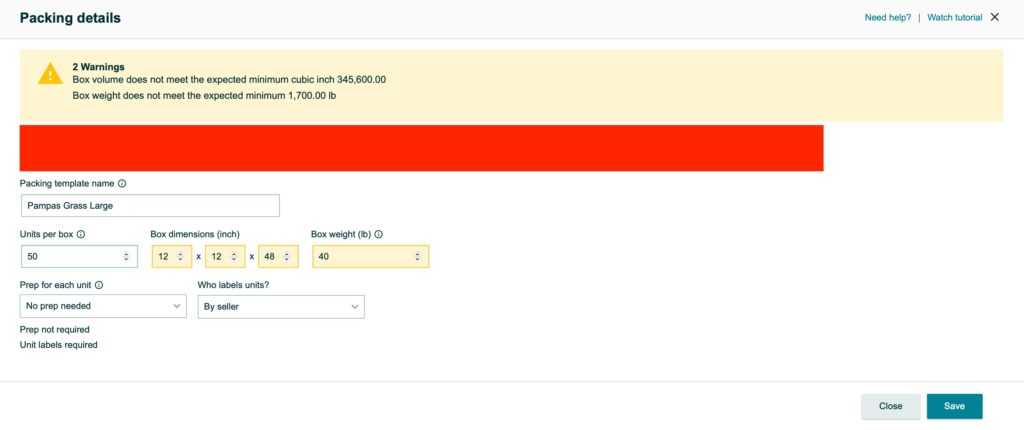
Accurate measurements are equally critical, so you might want to keep a calibrated scale and a measuring tape handy for every box you ship. Entering the wrong weight or dimensions can lead to shipping carrier adjustments that result in unexpected charges on your monthly statement.
You also need a clear labeling strategy, specifically deciding between using manufacturer barcodes or the specialized Amazon barcodes known as FNSKUs. For example, if you sell a private-label product, applying your own FNSKU labels prevents your inventory from being commingled with other sellers’ stock.

Amazon also requires precise documentation for items that need special handling, so you are now responsible for these prep tasks. This shift means that items like glass jars must be bubble-wrapped and labeled by you or a partner before they arrive at Amazon.
How to Create an Amazon Shipment Plan Step-by-Step?
Creating your Amazon shipment plan is a simple linear process that works best when you pay attention to the details at every stage. Following these steps helps ensure your inventory moves from your location to the Amazon shelf with the least amount of friction.
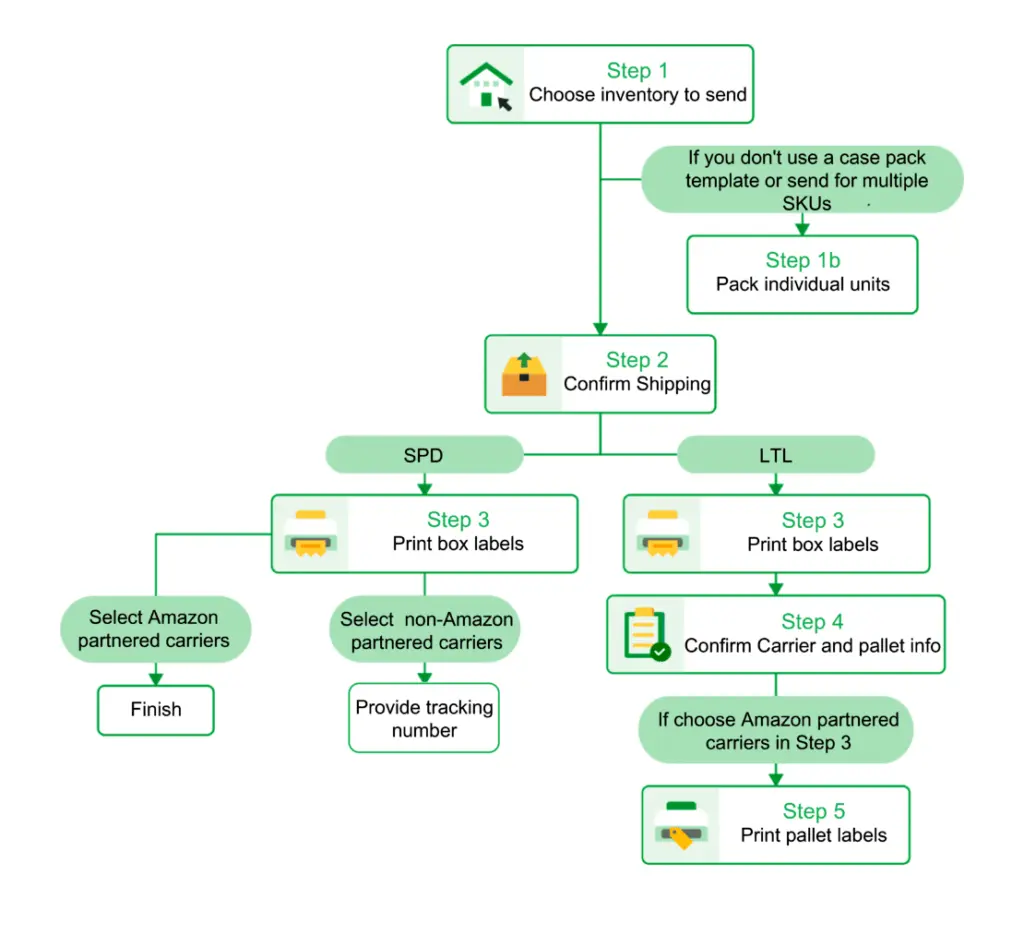
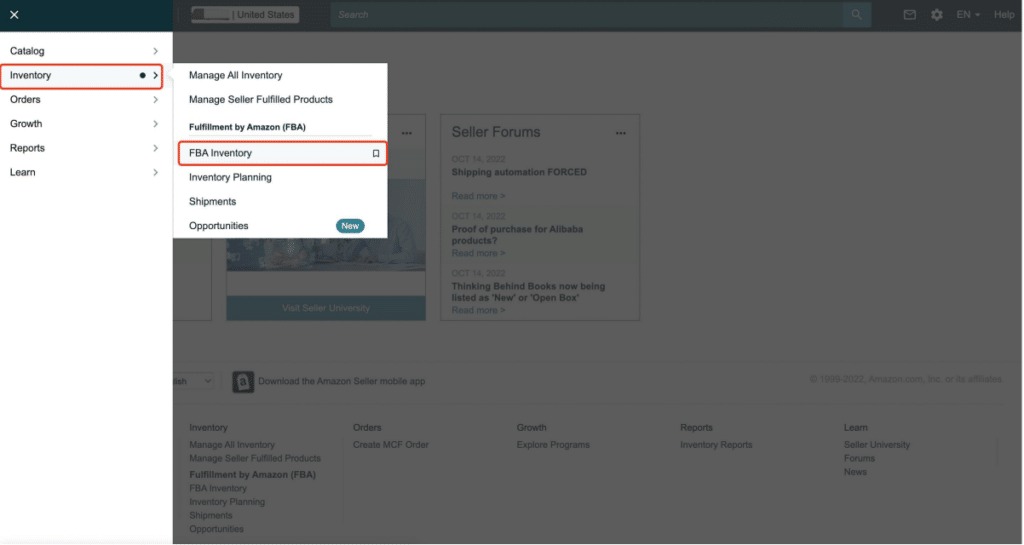
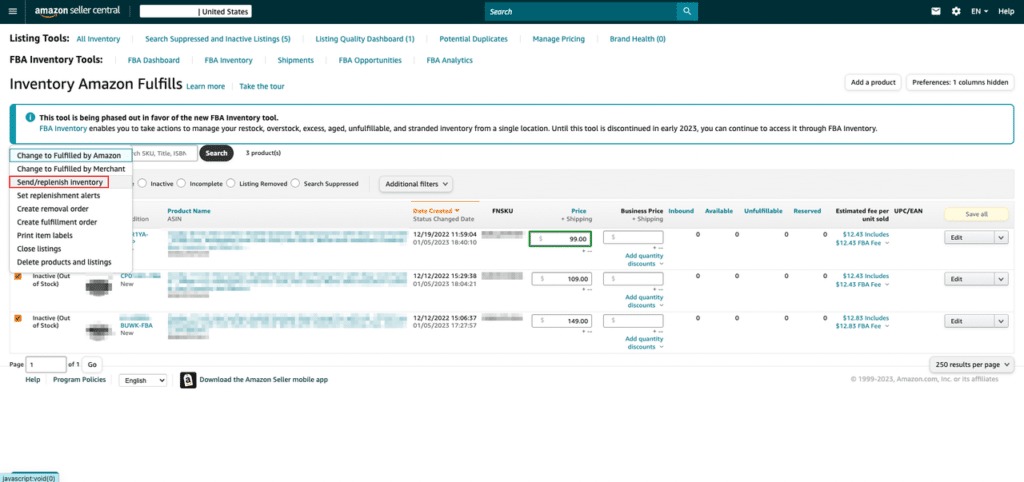
Step 1: Select Inventory
You can start by navigating to the Manage FBA Inventory page and selecting the specific products you wish to restock for the month. Clicking on Send or Replenish Inventory will open the Send to Amazon interface, which is designed to guide you through the process.

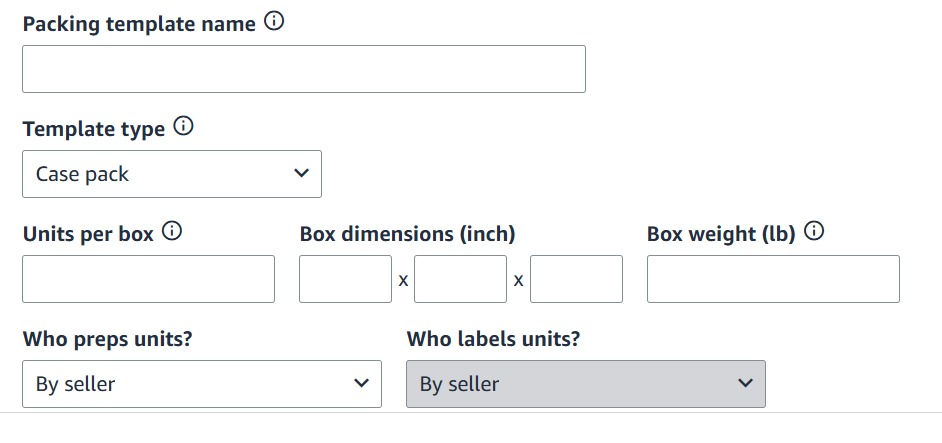
Step 2: Choose Packing Type
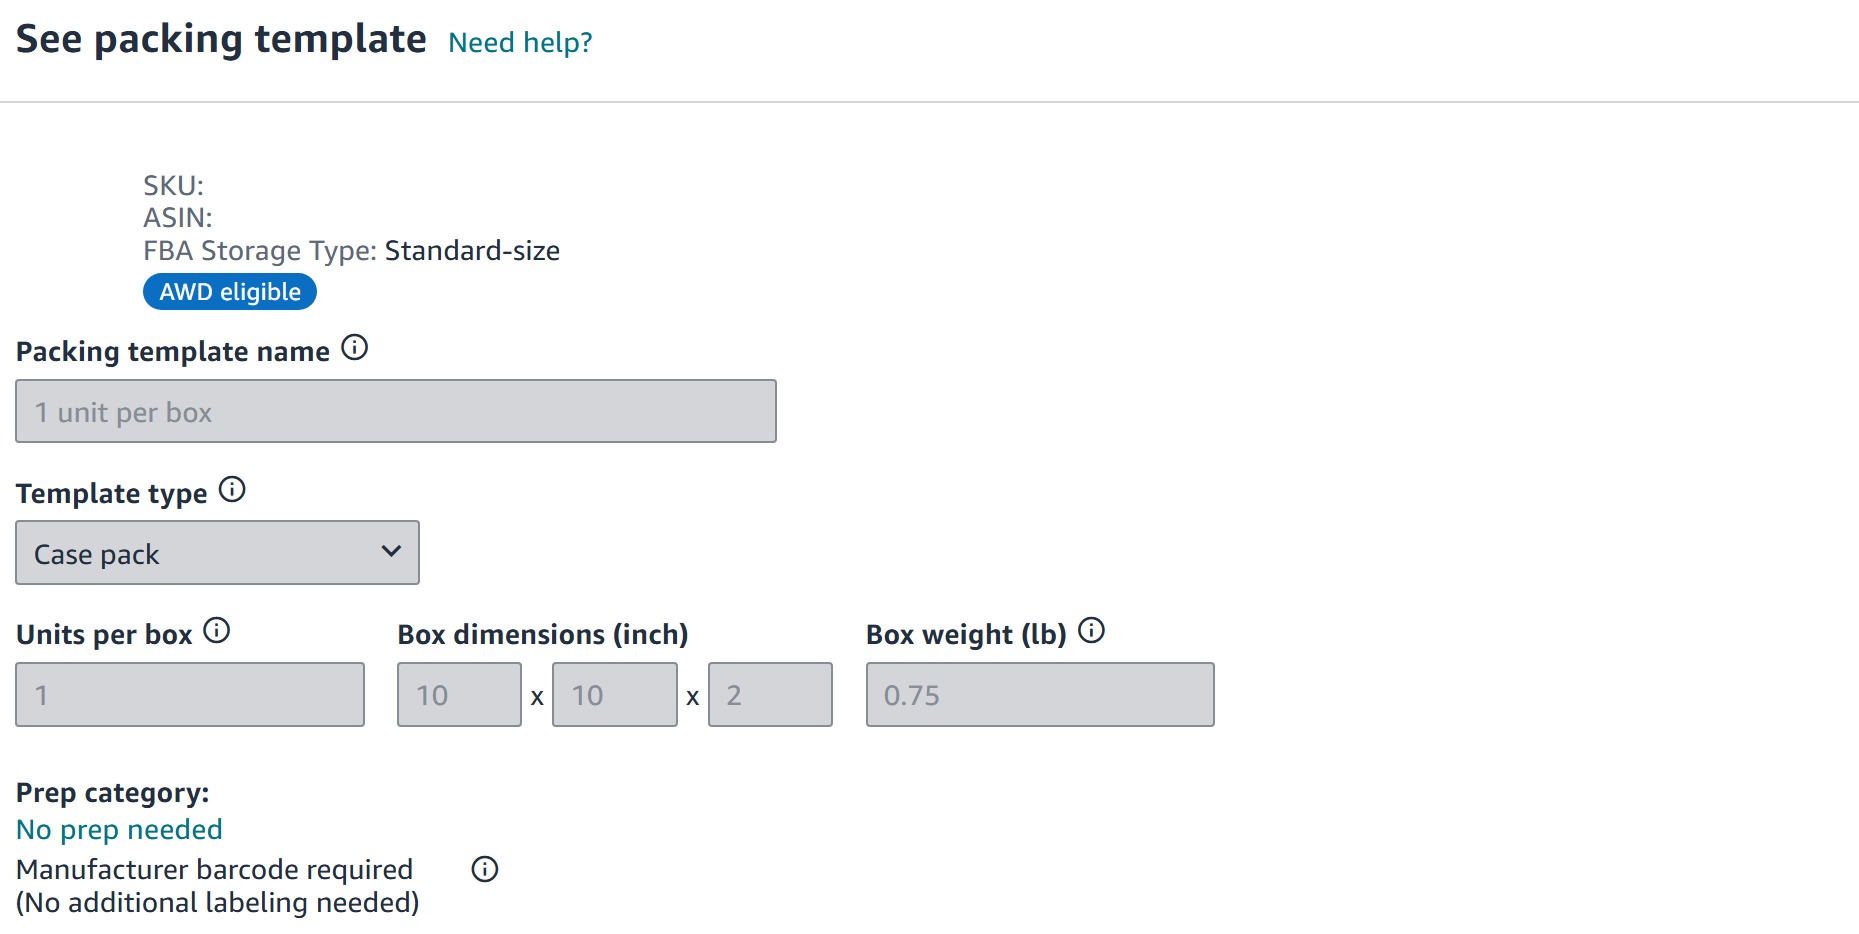
You can decide if you are sending individual units with multiple SKUs in one box or case-packed boxes with identical units. Using case-pack templates is a great practice for items you restock regularly, as it saves you from re-entering the same dimensions every time.
Step 3: Provide Prep and Label Details
In this step, you confirm that you have handled the prep, such as poly-bagging for apparel or bubble wrap for fragile items. Since Amazon no longer offers these services, marking these as seller-prepped ensures your shipment is not flagged as a defect upon its arrival.
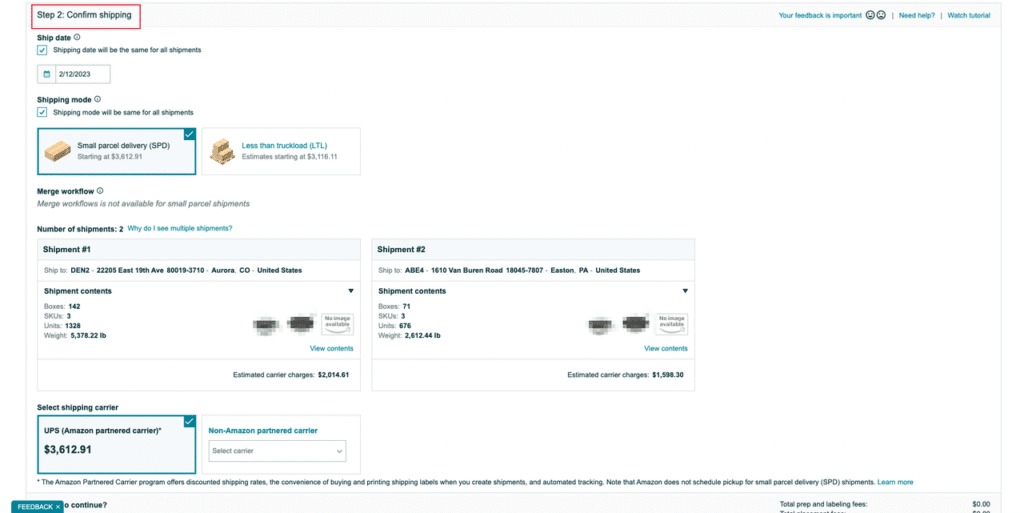
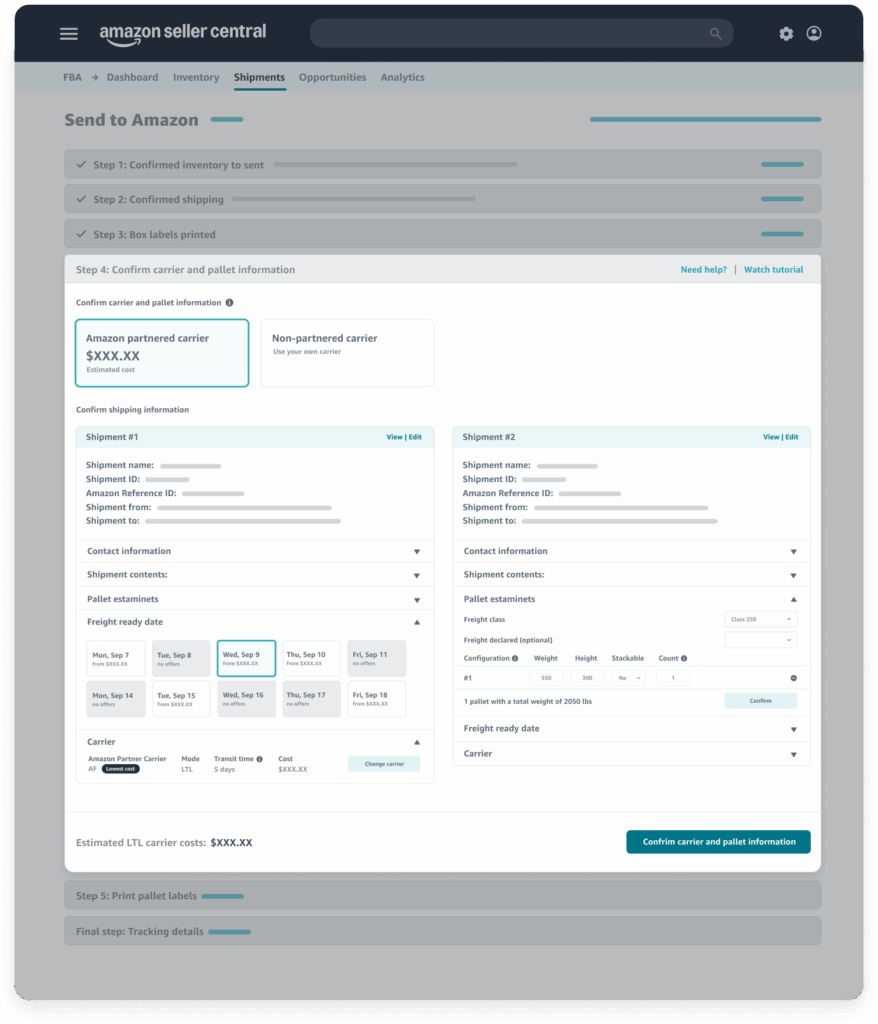
Step 4: Confirm Shipping Details
You can input your expected shipping date and choose a carrier, like an Amazon-Partnered Carrier, to take advantage of significantly lower rates. You will also select between Small Parcel Delivery (SPD) for individual boxes or Less Than Truckload (LTL) for larger pallet-based shipments.
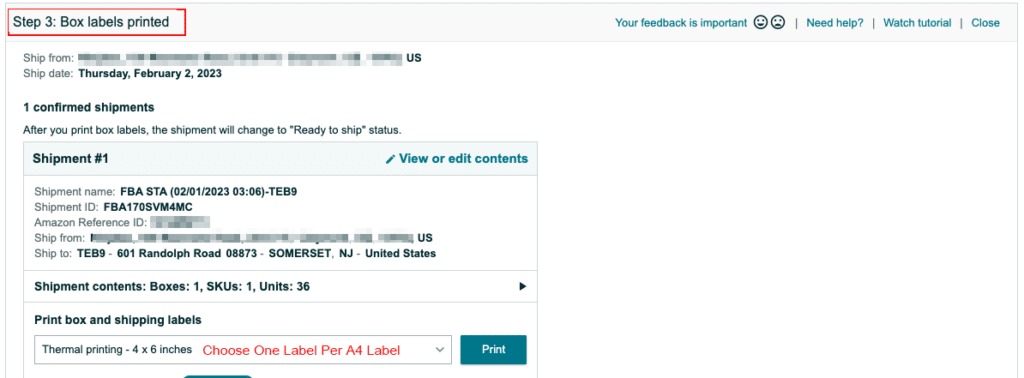
Step 5: Print Box Labels
Once the shipment is confirmed, you can print the unique FBA Box ID labels and the carrier label then attach them to the outside of each shipping container. It is a good idea to place these on a flat surface and avoid the box seams to keep them scannable.
What are Common Shipment Plan Mistakes and How to Fix Them?
Navigating the complexities of FBA logistics often leads to minor errors that can have a significant impact on your business’s bottom line. Understanding how to address these mistakes promptly will help you maintain a healthy and profitable Amazon Seller account.
How to Correct Weight and Dimension Discrepancies?
One frequent mistake is entering an incorrect weight or dimension for your shipping boxes during the initial setup phase in Seller Central. You can usually fix this by editing the listing details or contacting support if the shipment plan has already been confirmed.
What to Do if You Misroute a Shipment?
Misrouted shipments occur when a seller accidentally sends a box to a fulfillment center other than the one assigned by the plan. While Amazon can often redirect these for a fee, you can avoid this by double-checking your labels before the carrier arrives.
How to Resolve Labeling and Barcode Errors?
Labeling issues, such as unreadable barcodes or missing FNSKUs, can lead to your inventory being set aside as unsellable or problem stock. If this happens, you can often request a removal order to fix the labels yourself or pay for a specialty service.

What are the Best Practices for Managing Amazon Shipments?
Efficient inventory management is the secret to scaling your brand while keeping operational costs as low as possible for your business. Adopting these best practices will help you build a more resilient and predictable supply chain for your Amazon store.
Use Reusable Packing Templates for Recurring Items
Efficiency in logistics often starts with using reusable templates for your most common product configurations and shipping box sizes. If you frequently ship standard 12x12x12-inch boxes of yoga mats, for example, a template ensures your data entry is 100% accurate every time.
Save Money by Utilizing Amazon-Partnered Carriers
Utilizing Amazon-Partnered Carriers is a smart move because they offer deeply discounted shipping rates and automated tracking integration. These carriers are also very familiar with Amazon’s strict delivery window requirements, which helps reduce the chance of rejection.
Maintain Box Compliance and Strict Quality Control
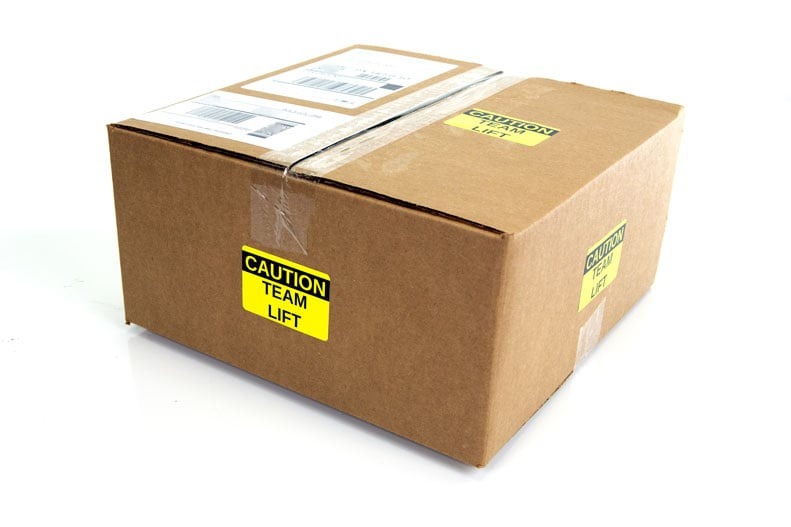
Physical quality control is a vital final pillar, including a shake test to ensure items are secure and boxes remain under 50 lbs. If a box is over 50 lbs, you can apply a team lift label on five sides to maintain compliance with safety rules.
FAQs About an Amazon Shipment Plan
1. Can I delete an approved shipment?
You can delete it, but doing so frequently after approval can lead to warnings or a suspension of your shipping privileges.
2. What is the difference between SPD and LTL?
SPD is for individual boxes sent via carriers like UPS, while LTL involves pallets for much larger freight shipments.
3. Can I change the quantity after confirming the plan?
Amazon allows for small adjustments of up to 5%, but larger changes typically require you to cancel the plan and start over.
4. What is a “Ship-from” address?
This is the physical location where your shipment originates, such as your home, a warehouse, or a supplier’s facility.
5. How much can a standard FBA shipping box weigh?
Standard boxes must not exceed 50 lbs unless they contain a single oversized item that naturally weighs more.
6. What happens if I forget a box label?
Amazon may reject the entire shipment at your expense, so it is vital to verify every box has its FBA ID label.
>>> Read more: Guide to Amazon FBA Shipping Cost and How to Cut It Smartly
Conclusion
An organized Amazon shipment plan is a foundational piece of a profitable FBA business that helps ensure your products reach customers quickly. By following the Send to Amazon workflow carefully, you protect your revenue from unnecessary fees and help your business grow smoothly.
You can stay ahead of the competition by regularly checking for updates to Amazon’s routing policies and inbound performance metrics. Mastering these logistics allows you to focus more on your brand strategy and less on the stress of manual inventory management.